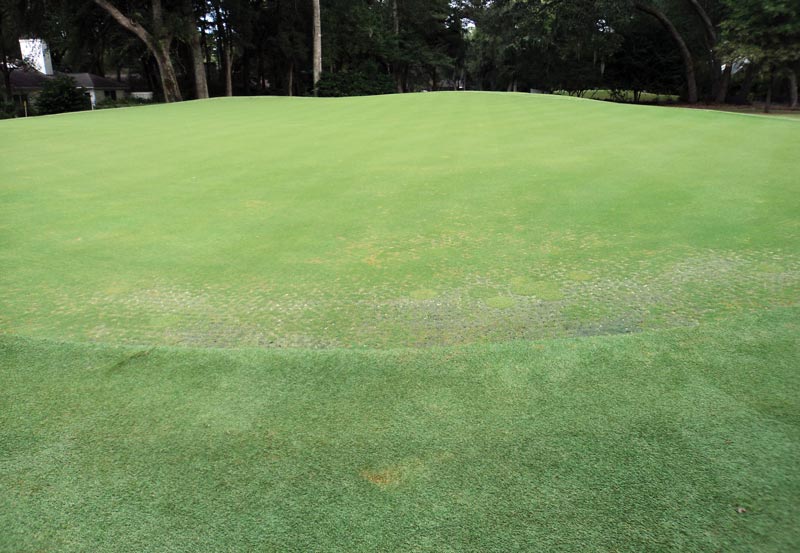
Beleaguered by black layer: Damage to the front of the green on the 11th hole of the Cotton Dike course appeared in 2011, shortly after renovation. The course, designed by Tom Fazio and opened in 1985, is one of two 18-hole layouts that make up Dataw Island Club. Photos courtesy of Brian Hollingsworth
Five years ago, when we renovated both golf courses here at Dataw Island Club in Beaufort, S.C., we were excited for our fresh start. The new greens, bunkers, fairways and irrigation system were just the fixes our courses needed, and the renovations were a breath of fresh air for our superintendent staff and maintenance crew, who had been dealing with deteriorating infrastructure and course conditions for years.
Somehow, though, new challenges always seem to spring forth. Two months after reopening the Cotton Dike golf course, our first to be renovated, we discovered a different issue: black layer on the greens.
Black layer: An underground foe
Black layer develops when oxygen levels in the soil drop because of saturated soil conditions. This normally occurs in low-cut, fine-turf areas and is especially damaging to turf roots. As the roots decline, turf health is seriously diminished, and thin, weak turf soon forms on the surface. Our problem began on the edges of greens — particularly in the low runoff areas — almost immediately after reopening Cotton Dike.
The question in all of our minds was, “Why?” The greens were brand-new, and this didn’t seem like an obstacle one would encounter so early in the life of a new USGA green. Upon investigation, multiple causes of the black layer became readily apparent.
The first issue was our greens mix. At construction, we’d chosen to increase the sand/peat ratio to 70/30 for our USGA greens. The reasons we did this were numerous, but the primary objective was to hold slightly more water in the upper root zone. We were grassing our greens with MiniVerde ultradwarf bermudagrass, which, like all ultradwarfs, does not have an exceptionally deep root system. In addition, our golf courses are located in a windy coastal environment, which tends to dry out the greens very quickly. Our hope was that the extra peat would hold available moisture for the greens slightly longer, and would hold it closer to the surface, where the shorter roots could still use it.
The second problem we identified was that the grow-in had resulted in saturation in certain green areas. With any grow-in, one typically overwaters to some degree, and we’d likely done so too, but with our heavier greens mix, the ensuing black layer came on at a much faster pace. The water collected particularly in the lower runoff edges of the greens, and this was even the case where there was plenty of slope that should have easily surface-drained the water off the green.
Next, we found that many sprinkler heads surrounding the greens were throwing too far and onto the putting surfaces. The heads had been spaced slightly closer to the greens to compensate for the windiness of our locale, but this caused them to distribute beyond where we’d intended.

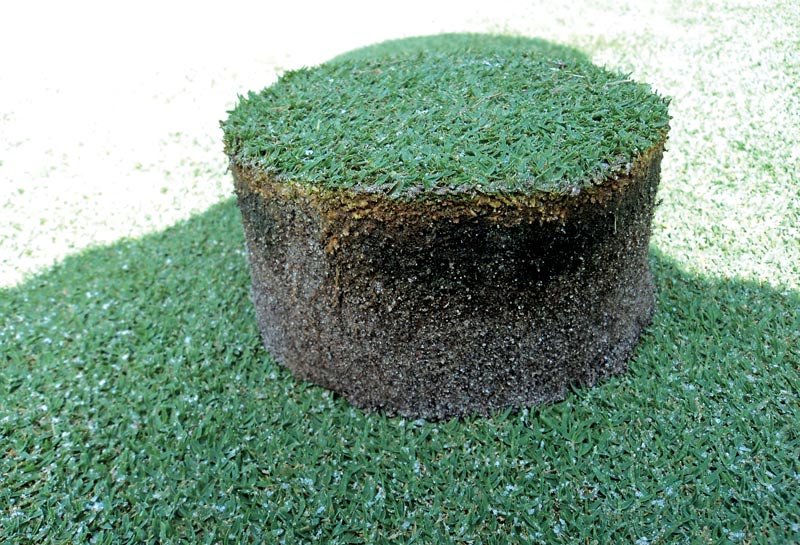
A plug plagued with significant black layer, removed from a green on Cotton Dike in 2012.
Another misstep that made the black layer explode so rapidly was our initial use of a wetting agent that held too much water in the upper root zone. This wetting agent was good for quicker grow-in, but it caused the upper root zone to stay continuously wet.
Finally, our poor-quality irrigation water seemed to make the black layer worse. We use reclaimed effluent water that’s high in bicarbonates and has some particulate matter in it at times. Both factors worked to slow down infiltration rates, which only exacerbated our troubles.
Assembling an action plan
Like the black layer problem, the black layer solution would have many components. There wasn’t one thing that had caused our issues, so one simple thing wouldn’t solve them either. We got to work right away, with our primary goals being to dry the greens surface, improve the downward flow of water out of the greens mix, and get air into the greens at the surface.
Every superintendent knows that one of the first actions you should take against black layer is aerifying the turf to get oxygen immediately down into the affected soil. Unfortunately, we were well into October before we realized the extent of our problem, and we’d already begun losing a substantial amount of turf. Additionally, we had just unveiled the renovated Cotton Dike course, and to avoid disrupting play significantly with our cultural practices, we didn’t want to aggressively aerify and topdress.
We decided to do a minor aerification of just the affected areas. We aerified a one-width pass across the affected edges, and then topdressed by hand to fill the holes. The holes were visible through most of the fall and winter, unfortunately, but this was an unavoidable step.
The next matter we focused on was getting control of the surface water and not allowing areas afflicted with black layer to receive any more water than they required. We immediately switched wetting agents, moving to a fast penetrant instead of the retainer-type product. We also drastically changed how we watered the greens on a daily basis. Normally, with bermudagrass greens, most superintendents rely heavily on overhead watering and then supplement with hand watering as needed. We completely reversed this concept and went to an aggressive hand-watering regimen. The change was aided by the addition of soil moisture meters, which gave us instant feedback on soil conditions. With these tools, we could put hard numbers on everything we were doing and pinpoint exactly where extra water was necessary.
Looking back, introducing soil moisture meters was probably the one thing we should have done much sooner. Using the meters, we sought to maintain our soil moisture at about 20 to 25 percent at the 3-inch soil depth. Our numbers in the black layer areas were continuously 40 percent or higher — precisely the problem.
The final step we took to control the irrigation water on the greens surfaces was to properly adjust all the outer sprinkler heads that were overlapping the greens edges. We altered the arcs on some, changed nozzles on others, and pushed their trajectories down as needed. Our new strategy was to limit all water hitting the greens, and to monitor that water very closely. We even went so far as to time any chemical or fertilizer applications that had to be watered in so that they were administered directly before a predicted rainstorm. We implemented every tactic we could think of to avoid irrigating the areas affected with black layer.
Black, out
As the spring and summer approached the following year, we were looking forward to beginning our first full growing season with the new greens and ultradwarf grass. As with any new greens, there were areas that were thinner from establishment, and we also wanted to focus on improving playability. The greens were still hard from construction, so both the golfers and our superintendent staff were ready to aerify to improve them. Now that the weather was conducive to turf growth, we could implement aerification strategies to commence countering the black layer problem and start regrowing the damaged turf on the surface.
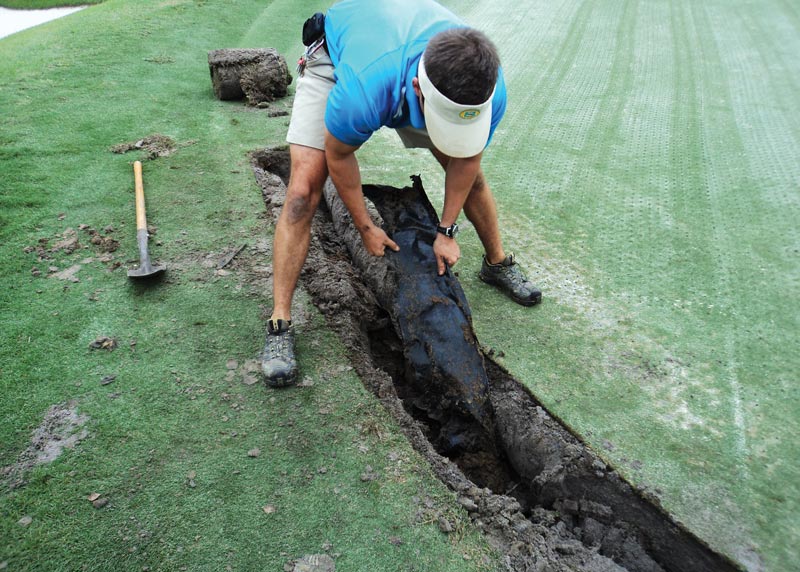
In early spring, we began by pulling the liners out of the greens along the low-lying edges, where the black layer was worst. At construction, we’d installed the liners as a means of establishing our greens edges and separating the greens from the surrounding soil. As our black layer troubles worsened, however, we began to think the liners were somehow “trapping” the water inside the green cavity. Our hope was that removing the liners would allow some water to be wicked away and exit the greens mix through the native soil.
Even though we had “smiley” drains at the low ends of every green, our heavy mix was still holding the water tightly, so we took this additional measure to help release the water as rapidly as possible. This was a messy step, but a needed one.
For our first core aerification of the year, we went with 5⁄8-inch tines on 2-inch-by-2-inch spacing, and aerified low-lying green edges a second time over, which totaled about 15 percent of total surface area disrupted. We did this several times in these areas during the summer, and followed each with a topdressing of straight coarse sand. Overall, we disrupted about 35 percent of the surface that summer.

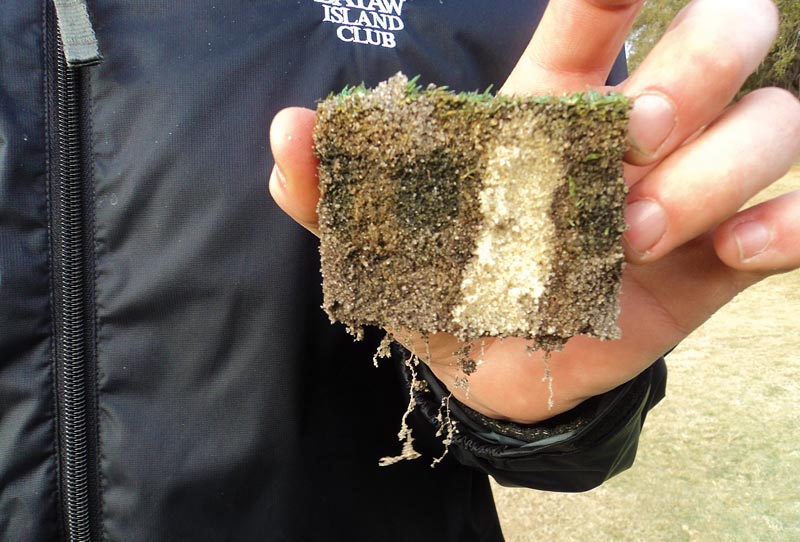
A turf sample showing diluted black layer and improved roots after two years of treatment, which involved, among other measures, aggressive aerification and modifying watering practices and inputs.
This aggressive aerification and sand addition was good, but the existing mix still had a tendency to stay wet, so we had to keep going. Later that summer, we incorporated a DryJect Maximus aerification machine, which injects sand in large, 3-inch slits downward to a depth of about 8 inches. We did this to all the greens surfaces, and they dried down nicely afterward.
Unfortunately, on the low areas, all of these aerifications triggered a new problem: The edges started sinking slightly, creating small “birdbaths” in the very spots we were trying to dry up.
The following summer, we initiated the second phase of our cultural plan. We began to focus on lowering the collars outside the greens just slightly, and lifting the sod inside the greens as needed to deal with the standing water potential on the putting surfaces. This change did, in fact, get the water off the greens. That second summer, we also decided to continue the aggressive aerification program and add a deep drill-and-fill aerification operation too. This would continue to inject straight coarse sand deep into our heavy mix in these low areas.
Even after implementing all of these cultural steps, eradicating black layer was a long, slow process, and it took two full summers of this regimen before it started to make a difference. Black layer is tough to get rid of after it has become established, but we were beginning to see progress, particularly on the putting surface. The thin turf on top now had full bermudagrass coverage.
Our battle wasn’t over, however. The black layer and wetness still had to be dealt with on a constant basis beneath the surface.
Water: Quantity and quality
The final piece to the black layer puzzle was to adjust for our water quality problems. The high levels of bicarbonates and particulate matter in the water definitely slowed down infiltration through the greens mix. We can’t change the irrigation water we are given, but we can change our nutrient addition plan.
To tackle the bicarbonate issue, we got much more aggressive with our calcium inputs. During aerifications, we consistently applied high levels of calcium into the open holes. Along with that, we began doing monthly flushes using gypsum or another calcium source. As you might expect, the greens dried down consistently across the entire green thanks to the flushing, but surprisingly, the dry-down included the always-wet black layer areas.
Though it seems odd, by adding more water and doing the flushes, we got a fresh start each month, with the black layer being drier than normal. By following the greens flush with the other practices of hand watering and irrigation control on the rest of the greens, we finally began to see changes in the content and amount of the actual black layer below the surface.

Assistant superintendent Jimmy Barker removes the liner from the edge of a green in the spring following the onset of black layer on the Cotton Dike course. The liners were intended as a barrier between greens and the surrounding soil, but the superintendent staff later suspected the liners were holding water inside the green cavity, intensifying black layer woes.
We also talked to two other superintendents who’d had success fighting black layer via several spray products. For best results, they recommended a combination of a penetrant wetting agent, a calcium product, a humic acid and a strong oxygenator product. By spraying this combo and following it with a hand-water flush with a calcium tablet, the black layer began to break apart and move downward.
All the programs described have been applied for four full summers now. This will be our fifth summer fighting black layer here at Dataw Island, and, unfortunately, it won’t be our last. Black layer is a difficult opponent to defeat, especially after it is severe. It typically isn’t caused by one thing, and it normally won’t be solved with one easy fix either. Fortunately, we have made positive strides in dealing with it, and all of our greens — including the edges — are now in excellent shape.
The best advice is to watch your greens very closely so black layer never has the chance to develop. Keep a soil moisture probe handy to alert you to any changes throughout a green. Hand-water as much as it takes, aerify as often as it takes, and make sure your wetting agent of choice matches your greens mix — one size doesn’t fit all.
Most important, be willing to make adjustments to your methods. Continuing to do the same things you’ve been doing won’t be effective against black layer after it has already made its way to your greens.
Brian Hollingsworth, CGCS, is the director of golf course maintenance at Dataw Island Club in Beaufort, S.C., where he has worked since 2005. He is a graduate of Auburn University and a 19-year member of GCSAA.